
- Edison™ Datalogue™ Connect Patient Access
- User Guide
- DOC2237425 Revision 5
Self-Registration
When checking out from the performing site, your healthcare provider has provided you with an Access Code handout page, please use the Access Code provided and Site Name listed during registration.
To register as a patient, please follow the steps listed below:
- Open the Edison Datalogue Connect Sign In page in your Web browser.
- Click Sign Up.
The Create an Account page displays in your browser.
- In the Select Role section, select Patient.
- Click Next.
- In the Account Details section, enter or select other information as indicated in the table below:
In this field
Enter or select this information
First Name (mandatory)
Enter your first name.
Note:Enter your first name as shown in the Access code handout.
Middle Name (optional)
Enter your middle name.
Note:Enter your middle name as shown in the Access code handout.
Last Name (mandatory)
Enter your last name.
Note:Enter your last name as shown in the Access code handout.
Email (Username) (mandatory)
Enter your email address. This email address will also be your username for signing in to the Edison Datalogue Connect Patient Access application. A confirmation email with a link to activate your account will be sent to this email address.
Note:Your email address (user ID) must be unique. You are not allowed to register with an already registered email address. If you have previously registered your email address, exit and log-in with your existing email address.
Enter your password.
Password should be at least 8 characters long. Use at least one lower case alphabet, one upper case alphabet, one number and one special character except "*".
Confirm Password (mandatory)
Re-enter your password.
Show Password (optional)
Check this box if you wish to see your password as plain text.
Note:Ensure that no one sees your password when you click on this check box to preserve password secrecy.
Access Code (mandatory)
Enter your access code. You should have received your access code from the Imaging Center that performed your study.
Site Name (mandatory)
Select the Imaging Center site where your imaging study was performed from the drop-down list.
Note:If the selected site belongs to an organization that has SMS usage deactivated then verification of Mobile Phone or SMS-enabled Device is omitted.
Address Line 1 (mandatory)
Enter your address.
Address Line 2 (optional) Enter additional address details.
Country (mandatory)
Select the country from the drop-down list.
Currently, you can register a new patient from the following countries: Austria, Belgium, Brazil, Canada, France, French Guiana, Ghana, Guadeloupe, Germany, Japan, Kenya, Martinique, Nigeria, Singapore, South Africa, South Korea, Switzerland, Tanzania, United Kingdom and United States.
City (mandatory)
Enter the city name.
State/Province (mandatory)
Select the state/province from the drop-down list.
Note:This field is disabled for countries that do not have state/provinces.
For example, if you select United States in the Country drop-down then you can enter California in the State/Province field. However, when you select France in the Country drop-down, the State/Province field gets disabled.
Tip:The State/Province field gets disabled for Austria, Belgium, Brazil, France, French Guiana, Ghana, Guadeloupe, Kenya, Martinique, Nigeria, Singapore, South Africa, South Korea, Switzerland and Tanzania.
ZIP/Postal Code (mandatory)
Enter the zip code or the postal code.
Note:The format for this field changes as per the selected country.
For example, if you select Japan in the Country drop-down then the format changes as per the Japan Zip code format i.e. XXX-XXXX.
Tip:For Canada, France, French Guiana, Guadeloupe, Germany, Martinique and United States, the Zip/Postal code format provided is 5 characters (all numbers). For Japan, the Zip/Postal code format provided is 7 characters. In the Zip/Postal code of Austria, Belgium, Brazil, Ghana, Kenya, Nigeria, Singapore, South Korea, South Africa, Tanzania and United Kingdom, alphabets characters are allowed.
Mobile Phone or SMS-enabled Device (mandatory)
Enter your mobile phone number. A verification code to activate your account will be sent to this number if your site belongs to an organization that has SMS usage activated. No verification code is sent if your site belongs to an organization that has SMS usage deactivated.
Important:Provide only mobile phone number that is in your possession. This number will be validated in the next registration steps and when necessary will be used to authenticate your identity.
Note:The format for this field changes as per the selected country. The Country Code is updated as per the selected country and it is editable.
For example, if you select France in the Country drop-down then the country code is displayed for France i.e. +33 and the format changes as per the France phone numbers i.e. XX-XX-XX-XX-XX.
Phone Number (mandatory)
Enter your home phone number.
Ext. (optional)
Enter the extension of your phone number, if applicable.
- Type the CAPTCHA code.Note:
The CAPTCHA code is displayed only if the organization you are subscribed to has enabled this option.
Note:CAPTCHA is case sensitive. Click
 (Reload CAPTCHA) for a new code.
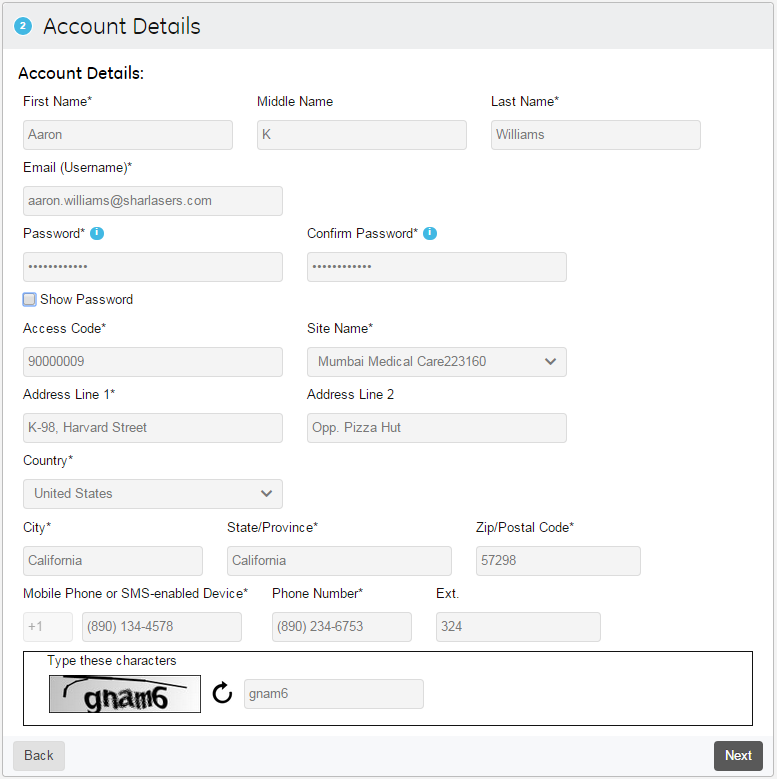
- Click Next to continue.Note:
If any field is left blank and you click the Next button, data error signs are displayed in red.
Note:You will not see the Verification Step section if your site belongs to an organization that deactivated SMS usage. In such a case, you will be navigated to the Security & Usage Agreements section.
- In the Verification Step section, enter the verification code you have received through SMS on your registered mobile phone number.Note:
The verification code remains active only for 30 minutes. If you have not received the verification code or the verification code has expired, please click the Resend the SMS message link. Sometimes after clicking the Resend SMS message link, you may also receive the previous verification code, in this case use the latest verification code you have received.
- In the Security & Usage Agreements section, enter or select information as indicated in the table below.
In this field
Enter or select this information
Security Question 1
Select a security question from the drop-down list.
Security Answer 1
Enter the relevant security answer.
Note:Note down the security questions and answers for safe keeping. You will need these answers if and when you want to reset your password.
Security Question 2
Select a security question from the drop-down list.
Note:The security question selected as Security Question 1 will not be available for this selection.
Security Answer 2
Enter the relevant security answer.
Note:Note down the security questions and answers for safe keeping. You will need these answers if and when you want to reset your password.
Usage Agreements
A list of usage agreements is displayed in this section. Click View Details to view or download these agreements. You can check the I Agree box only after you view the agreements. Check the I Agree box to proceed.
- Click Next.
The Confirmation section appears.
The Confirmation section indicates you have successfully created an account. You should receive a confirmation email with a link to activate your account within the next 24 hours.
- Click the activation link or copy and paste it in your Web browser.
The Sign In page is displayed.
Upon successful activation, you will receive a confirmation email stating that your account has been successfully activated. You can now sign in with your newly created account credentials.
To enhance your experience and for your convenience the system will automatically create your case using the Access Code that was provided during the self-registration. The newly created case is shown in the Recent Studies in the Case List.
Note:If the case already exist for the patient then new case is not created.